

This also applies to cable, chain, and webbing.
Gear that is anchored includes anchors, rocks, trees, tripods, trucks, etc.
A "bight" is a simple loop in a rope that does not cross itself.
A "bend" is a knot that joins two ropes together. Bends can only be attached to the end of a rope.
A "hitch" is a type of knot that must be tied around another object.
"Descending devices" (e.g., ATCs, Brake Bar Racks, Figure 8s, Rescue 8s, etc) create friction as their primary purpose. The friction in descending devices is always considered when calculating forces.
The "Safety Factor" is the ratio between the gear's breaking strength and the maximum load applied to the gear (e.g., 5:1).
The Graphics page in the Gear Builder specifies the gear's image. You must own, and be familiar with, graphics editing software to create the images. Quality images are the key to creating realistic-looking gear.
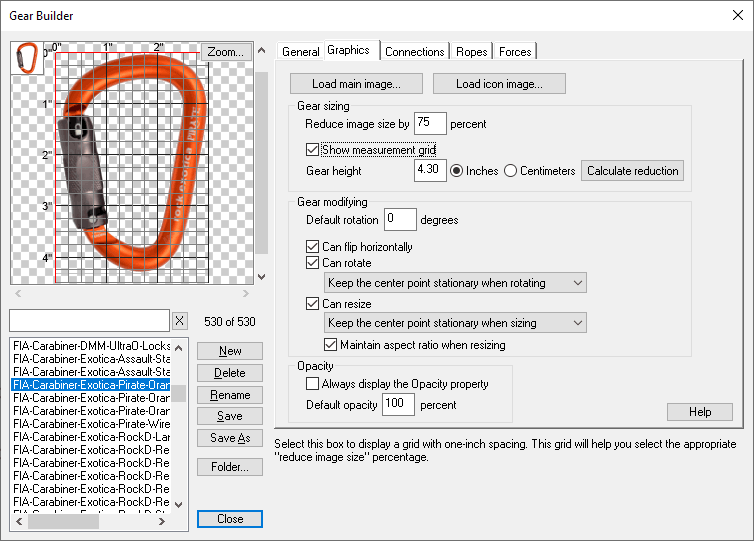
The Zoom button changes the display of the image so you can see how it will appear when zoomed to various percentages. For example, if you choose "Zoom 100%," the image will be sized as if the vRigger workspace was zoomed to 100%. The Zoom button only changes the appearance of the item within the Gear Builder and does not change how the image will appear in vRigger.
If you select Auto Zoom, vRigger will choose the maximum zoom percentage where the gear will still fit in the preview window.
Click the Load main image button to load the gear's image into the Gear Builder.
The image should be in the png file format and should be transparent except for the gear.
For compatibility with previous versions, vRigger allows you to load a bitmap (i.e., bmp) file and it will convert areas of the bitmap that are "pure" yellow to transparent. However, this may result in the gear having a faint yellow border. Whenever possible, use the png format.
Read detailed instructions on using Photoshop to create images.
Refer to the instructions on the Forces Page of the Gear Builder for information on creating images of knots (e.g., the graphic images used for knots should be green, the "Is a Knot" checkbox on the Forces page should be selected, and you can use the additional rope segment commands to create images of knots, etc).
vRigger stores an "icon" image that is displayed in the upper-left corner of the Gear Builder's preview pane. This is the image that will appear in the gear panes.
If the image you load using the "Load the main image" button is in the png format, you will be asked if you want to create the icon image based on the main image. That is the best choice in almost all cases. However if you want to specify a different image for the icon, click the Load icon image button and select an image file. The icon image should be 32x32 pixels, on a white background, and in the bmp or png file format. If the image is in a different format you will need to convert it to one of these formats using graphics editing software.
The Reduce image size value reduces the size of the image from its native size to the size it will appear in vRigger. This allows the image to maintain its high-resolution appearance when the workspace is zoomed or printed.
The image you load using the Load main image button should be sized and reduced as follows:
| Type | Size | Reduction |
| Handheld rigging gear | 50 pixels per inch | 75% |
| Handheld firefighting gear | 25 pixels per inch | 75% |
| People | 900 pixels tall | 50% |
| Tripods | 900 pixels tall | 40% |
For example, a carabiner that is three inches long should be 150 pixels (50 pixels per inch times three inches).
You can select the Show measurement grid checkbox on the Graphics page of the Gear Builder to display a grid on top of your gear. The grid measurements are appropriate for small rescue gear. For small firefighting gear, the gear should be half the grid measurement size (e.g., a nozzle that is 10 inches long and reduced by 75% will measure 5 inches long on the measurement grid).
Optionally, you can specify the approximate gear height in the Gear height box and then click Calculate reduction to have vRigger calculate the image reduction.
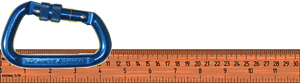
You can add both your gear and the ruler "gear" to the workspace to measure the size of your gear.
It may take a little trial and error to determine the percentage to reduce your image. In general, you should size rigging gear so it measures correctly with the ruler or measurement grid (i.e., 50 pixels per inch reduced by 75%). Small firefighting gear should be half-sized compared to the ruler. People and tripods should be sized at approximately 50% of their actual height when compared to the ruler or they will occupy too much of the workspace (you can always resize the people after adding them to the workspace).
If the image in the file is too small, you can specify a negative number for the Reduce image size value to increase its size, but this will cause the image to appear blurry. You can use the Zoom button in the Gear Builder to see how the image will appear on the vRigger workspace when zoomed to various percentages.
The Default rotation specifies the amount that the item should be rotated when it is first displayed. For example, if you enter "90" the gear will be rotated clockwise 90 degrees when it is added to the workspace. You can enter a negative number (e.g., "-90") to rotate the gear counterclockwise. Of course, you can always rotate the item after adding it to the workspace.
Select this box to allow the gear to be flipped horizontally. Symmetrical gear, such as a ball, typically should not allow flipping, whereas asymmetrical gear, such as a rescuer, should allow flipping. Gear that contains prominent text, such as a logo, should not allow flipping or the text will appear backward.
Select this box to allow the user to rotate the item. Most gear should be allowed to rotate, but you might not permit rotating on a few items (e.g., a lamppost, a flag, etc).
A dropdown list allows you to specify the location on the gear that should remain stationary when the gear is rotated. In almost every case you should choose Keep the center point stationary when rotating. An exception might be something like an arrow where you may want the tip of the arrow to remain stationary. (Note that if you rotate gear using the optional "rotator on a stick," the gear will rotate on its center point regardless of this setting.)
Select this box to allow the user to size the item. Most gear should be allowed to resize.
A dropdown list allows you to specify the location on the gear that should remain stationary when the gear is resized. In almost every case you should choose Keep the center point stationary when sizing. An exception might be something like an arrow where you may want the tip of the arrow to remain stationary.
When checked, this option ensures that the relationship between the item's height and width remains constant when you resize the gear. When unchecked, you can resize the height and width independently. In almost all cases you should leave this box checked. A few exceptions are for the "fire" and "smoke" items that are used with firefighting illustrations—it is helpful to be able to size the height and width of these items independently.
The Maintain aspect ratio checkbox is disabled when the Can resize checkbox is unchecked.
The Opacity property in the properties pane allows you to specify how transparent an item is. The Always display the Opacity property checkbox on this page of the Gear Builder controls whether the Opacity property is always available for this type of gear, or if it is only displayed when the identically named option is selected on the General page of the Options dialog.
The Default opacity field specifies the default opacity when this item is added to the workspace. A value of 100% is fully opaque while a value of 20% is very transparent. This should almost always be set to 100%.