This also applies to cable, chain, and webbing.
Gear that is anchored includes anchors, rocks, trees, tripods, trucks, etc.
A "bight" is a simple loop in a rope that does not cross itself.
A "bend" is a knot that joins two ropes together. Bends can only be attached to the end of a rope.
A "hitch" is a type of knot that must be tied around another object.
"Descending devices" (e.g., ATCs, Brake Bar Racks, Figure 8s, Rescue 8s, etc) create friction as their primary purpose. The friction in descending devices is always considered when calculating forces.
The "Safety Factor" is the ratio between the gear's breaking strength and the maximum load applied to the gear (e.g., 5:1).
The Connections page in the Gear Builder controls how other gear connects to this gear. Most of the controls on the Connections page are disabled until you add at least one gear connection.
The This gear connects to option at the top of the Connections page specifies the type of gear this gear can connect to. If you set this to Anything, the gear connections will be able to connect to any gear (e.g., carabiners, fire hoses, etc), but it is helpful to limit the type of gear to either fire hose (for gear used in firefighting illustrations), industrial gear (for pipes, walls, etc), or to rigging gear (for most items in vRigger).
Click the Add Gear Connection button to add a new gear connection. Each piece of gear can have a maximum of 12 gear connections.
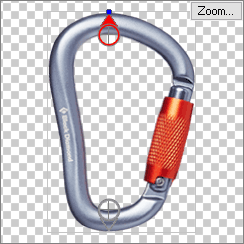
The gear connections are displayed as a round dot with an arrow. When a gear connection is selected, it is displayed in red with a dark blue rotation handle near the end of the arrow.

Drag the rotation handle so the arrow points in the direction that this item should connect to other gear. Press the Shift key while dragging the handle to constrain the rotation to 15° increments.
The carabiner shown here can connect at two locations. The arrows identify the direction of the connections.

You can "nudge" a gear connection by clicking on the connection and, while still holding your mouse button pressed, pressing the arrow keys on your keyboard to move the connection one pixel at a time.
Click the Delete Gear Connection button to delete the currently selected gear connection.
Click on a gear connection to select it.
You can also use the >> button to move the selection to the next gear connection. This button is disabled when there are fewer than two gear connections.
Select the This gear connection opens checkbox if the selected gear connection can open to connect to other gear. For example, both connections on a carabiner can open, whereas the eye on a pulley typically cannot open.
When you attempt to connect gear in vRigger, normally one of the two pieces of gear must open or the gear will not connect. For example, you normally cannot connect the eyes on two pulleys because neither connection opens. However, if you enabled the Allow non-opening gear to connect option on the General page of the vRigger Options dialog, gear will connect even if neither connection opens.
Specify the amount that two pieces of gear can be out of alignment and still connect. For example, if two pieces of gear each specify 15 degrees, they can be out of alignment by 30 degrees and still connect. Learn more about connecting gear that is not aligned.
Enter the number of items that can connect to the selected gear connection.
Use this option to specify the sound the gear makes when it connects to other gear.
The sound that you hear when two pieces of gear connect depends on both pieces of gear. For example, when a knot (which makes a rope sound) is connected to a carabiner (which makes a click sound), you will hear a click. Use the "Other" sound for solid connections, like industrial pipes, walls, and I-beams.
If none of the gear connections can open, it is best to leave the sound set to none.
Select this checkbox if gear that is connected to this gear should appear "linked" to this item. When in doubt, leave this checkbox selected.
Some of the items in vRigger that have this option unselected are the raft (because the D-Rings are in the middle of the raft), the pipes (because they don't interlock), the firefighting gear, and the clove and munter hitches (because the carabiner shouldn't split these hitches). Learn more about displaying gear that isn't interlocked.
These two radio buttons are only enabled when the Show item as interlocked with linked gear is unchecked (i.e., when you do not want the gear to appear linked when it is connected to other gear). Learn more about displaying gear that isn't interlocked.
Select either "in front" or "behind" to specify where this item should be drawn relative to linked gear.