

This also applies to cable, chain, and webbing.
Gear that is anchored includes anchors, rocks, trees, tripods, trucks, etc.
A "bight" is a simple loop in a rope that does not cross itself.
A "bend" is a knot that joins two ropes together. Bends can only be attached to the end of a rope.
A "hitch" is a type of knot that must be tied around another object.
"Descending devices" (e.g., ATCs, Brake Bar Racks, Figure 8s, Rescue 8s, etc) create friction as their primary purpose. The friction in descending devices is always considered when calculating forces.
The "Safety Factor" is the ratio between the gear's breaking strength and the maximum load applied to the gear (e.g., 5:1).
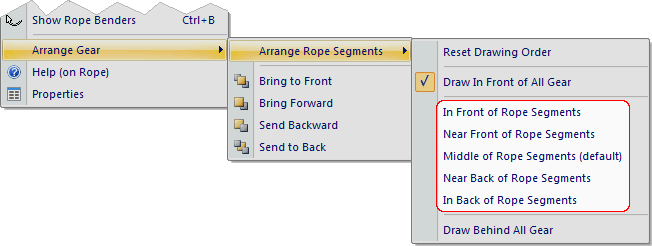
The commands in the Arrange group on the Home toolbar allow you to specify which gear is drawn in front of, or behind, other gear. Learn about those commands.
You can also right-click on an individual rope "segment" to display its shortcut menu, choose Arrange Gear, and then choose Arrange Rope Segments to select Draw in Front of All Gear or Draw Behind All Gear.
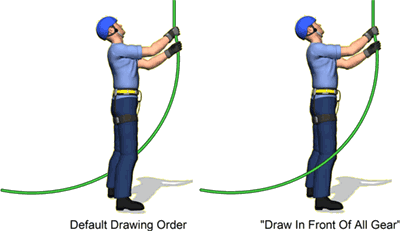
These commands allow you to draw the selected segment of rope either in front of, or behind, all other gear. In this next illustration, the Draw in Front of All Gear command was selected so the rope would be drawn in front of the rescuer.
You can enable additional commands in vRigger that provide even more control over the drawing order of individual rope segments. These commands are used primarily to create illustrations of knots. You might use these illustrations to teach others how to tie knots or use them to create new knots using vRigger's Gear Builder.
These additional commands are undeniably complicated and require exceptional spatial intelligence. It is almost always best to use vRigger's predefined knots or to copy a knot-tying illustration from RopeRescueTraining.com, rather than using these commands.
If you are up for a challenge, you can enable these additional commands by selecting the Enable the rope arrangement commands checkbox on the General page of the Options dialog. When this option is enabled, five additional commands are displayed when you select Arrange Rope Segments. (These commands are outlined in red in this next illustration.)
There are several keys to successfully drawing knots using these five commands. First, you must have a good understanding of what the finished knot should look like. You may find it helpful to first tie the knot with an actual piece of rope and then draw it on paper. Second, you will need to use slack points, and a lot of them, to divide the rope into different "segments." Slack points are crucial because these additional commands allow you to move rope "segments" in front of, and behind, other rope segments. The slack points help you split the rope into multiple segments. And third, you'll want to become an expert at using rope benders.
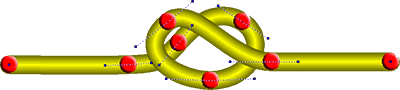
The following illustration shows an overhand knot, but before changing the drawing order of the rope segments. All of the red dots, except the two on the ends of the rope, are slack points.
When creating illustrations of knots, it is much easier to move the slack points by nudging them using the arrow keys on your keyboard rather than dragging them with your mouse.
It is helpful to use the alignment commands. You can see that several of the dots in this illustration are on the same vertical level.
The rope benders are displayed in the above illustration. Remember that if you hold the Shift key pressed when dragging a bender, it synchronizes the opposing bender and creates a smoother bend.
This next illustration shows the same knot, but after using the "arrange rope segments" commands to change the drawing order. The labels show the menu commands that were selected for each of the rope segments.
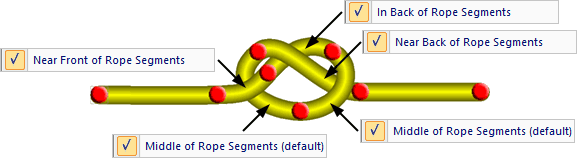
These rope segments could be arranged differently and still retain the same appearance. For example, the segment that is "near front of rope segments" could be "in front of all segments" and the knot would look the same. If you feel like you need more than these five "arrangement" options, it probably means you need to add another slack point to divide a rope segment.
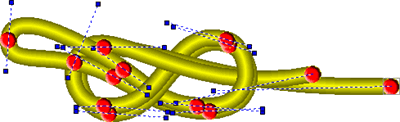
Complicated illustrations, including all of the knot-tying illustrations on RopeRescueTraining.com and most of the knots in vRigger, were created using these commands. The following illustration shows the slack points and rope benders that were used to create a figure-8 on a bight illustration. Determining the correct drawing order to create this illustration was undeniably challenging.
After creating a knot image, you could save the image as a png file and then use that image to create a knot using the Gear Builder. That's how most of the knots in vRigger were created.
Watch a video that explains how to control the drawing order of gear.
Learn more about rope routing.