This also applies to cable, chain, and webbing.
Gear that is anchored includes anchors, rocks, trees, tripods, trucks, etc.
A "bight" is a simple loop in a rope that does not cross itself.
A "bend" is a knot that joins two ropes together. Bends can only be attached to the end of a rope.
A "hitch" is a type of knot that must be tied around another object.
"Descending devices" (e.g., ATCs, Brake Bar Racks, Figure 8s, Rescue 8s, etc) create friction as their primary purpose. The friction in descending devices is always considered when calculating forces.
The "Safety Factor" is the ratio between the gear's breaking strength and the maximum load applied to the gear (e.g., 5:1).
In addition to rope rigging, you can create top-view firefighting illustrations with vRigger. Working with the firefighting equipment in vRigger is very similar to working with rigging gear.
The firefighting equipment (e.g., hoses, hydrants, etc) is included in the "optional gear kit."
What do you want to do?
The firefighting gear is included in the optional gear kit. You can determine if you own the additional gear by displaying the Licensed Industries dialog.
The firefighting gear includes fire engines, firefighters, flames, hoses, hydrants, nozzles, smoke, standpipes, trees, etc. Contact us if there is firefighting gear that you would like added to vRigger (or you can create the gear using the Gear Builder).
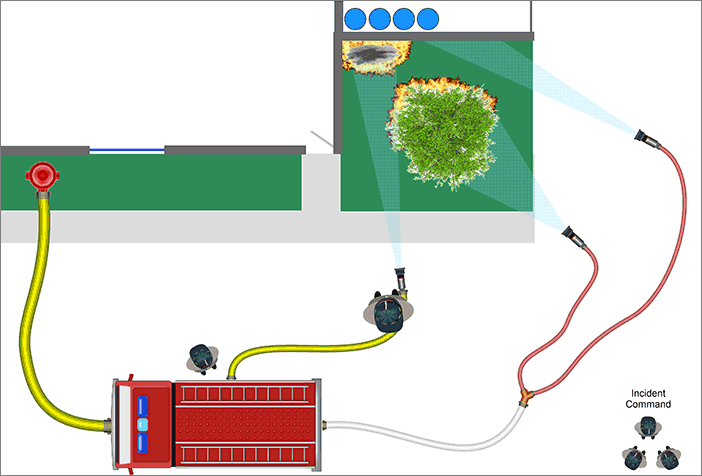
In addition to the firefighting gear, the "shapes" in vRigger (i.e., the box, ellipse, and line) are helpful when drawing firefighting illustrations. For example, you can use these shapes to draw buildings, fields, parking lots, etc as shown below. The Insert Picture command is also helpful because it lets you add pictures to your illustrations (this is shown in the video about creating firefighting illustrations).
You add firefighting equipment to the workspace the same way you add rigging gear to the workspace: by typing the name of the equipment and selecting it in the Gear Finder, by dragging the item from a gear pane, or by selecting the item in the Gear toolbar. (If you know the name of the item you are looking for, the Gear Finder is a screaming-fast way to add gear to the workspace.)
You connect firefighting items the same way you connect rigging gear: by dragging an item with your mouse, aligning the blue connection dots, and then dropping it. You can connect fire gear to other fire gear, for example, you can connect hoses to engines and hydrants, but you can't connect fire gear to rigging gear, like carabiners. Learn about connecting gear.
You delete firefighting items the same way you delete rigging gear, by selecting it and choosing Delete (either from the Home toolbar, the item's shortcut menu, or by pressing the Delete key). Learn about deleting gear.
Working with hose in vRigger is very similar to working with rope. Note that some commands, and this online Learning Center, may only mention "ropes," but you can use any of the "rope" commands on hose.
The video that explains how to create firefighting illustrations also explains how to work with hoses—it's worth a few minutes of your time.
As mentioned above, you can add hose to the workspace using the same methods you use to add gear to the workspace. The fastest way to add a hose to the workspace is to click on the workspace, type "hose", and press Enter.
To change the size or color of a hose, click on the hose (or one of the connectors on the ends of the hose) to select it, and then set the size or color in the properties pane.
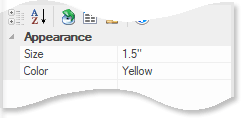
The Size field in the properties pane specifies the diameter of the hose. You can enter the size followed by "mm" (for millimeters), "cm" (for centimeters), "%" (for percent), or "in" or doublequotes (for inches). For example, you can enter 50 mm, 5 cm, 2.5 in, 2.5", etc. If you don't specify the measurement units, vRigger will default to the units you last used when sizing a hose. If you always work with the same measurement units (e.g., inches), you only need to specify the units once. Learn more about entering the size of rope, webbing, and hoses in mm, cm, and inches.
To connect hose to other fire equipment, use your mouse to drag a connector on the end of a hose, align the connector's blue connection dot with another connection dot, and drop the end of the hose. You can also drag other fire equipment (e.g., a hydrant), align its connection dot with the blue dot on the end of a hose, and drop it.
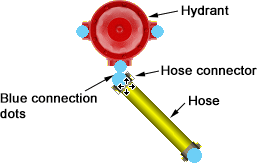
When the connector on the end of a hose connects to other fire equipment, the hose connector rotates so it is aligned with the other equipment. The hose is then "bent" to create a curve in the hose. See "bending hose," below.
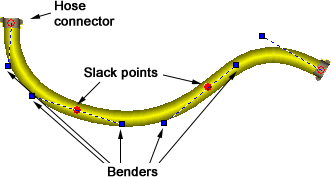
vRigger can display "benders" on the ends of hoses, and ropes, so you can create curves.
To display the benders, select the Rope Bender option on the View toolbar. You can then drag the blue handles that appear near the ends of the hose. Learn more about bending hoses and ropes.
You can also add slack points to a hose by clicking on the workspace, typing "slack", pressing Enter, and then dragging and dropping the slack point on a hose. You can then drag the slack point's benders to add additional curves to the hose. Learn more about slack points.
To add smoke or flames to the workspace, drag them from a gear pane or click on the workspace, type "smoke" or "flames", and press Enter.
Click on the smoke or flames to select it and then drag the sizing handles to resize it. You can create multiple layers of flames and smoke to change the fire's appearance.

To change the opacity (i.e., transparency) of smoke or flames, select the item and then change its Opacity field in the properties pane. Learn about the opacity property.
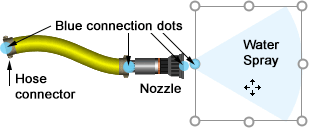
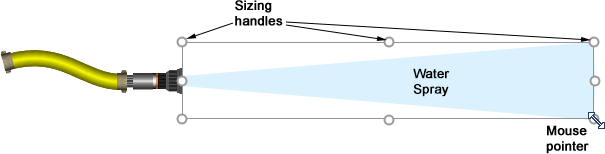
To add the "water spray" to the workspace, drag it from a gear pane or click on the workspace, type "water spray", and press Enter. You can use a similar approach to add a nozzle to the workspace.
To connect the water spray to other gear, drag it with your mouse, align the blue connection dots, and drop it.
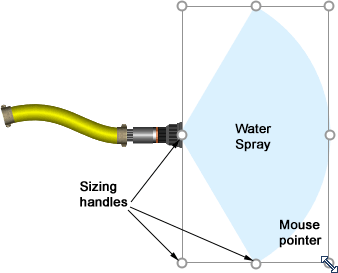
To change the size of the water spray, click on the water spray to select it and then drag any of the sizing handles.
To change the opacity (i.e., transparency) of the water, select the water spray and then change the Opacity field in the properties pane. Learn about the opacity property
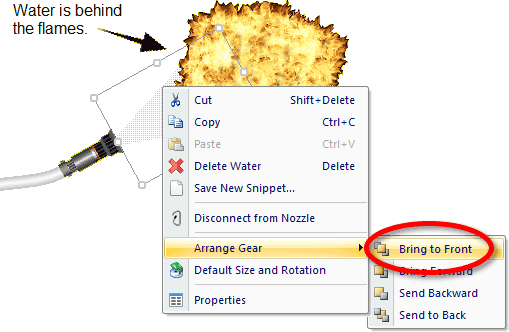
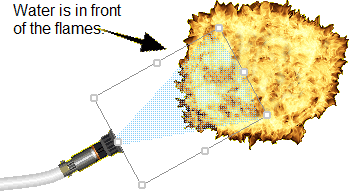
When you add gear to the workspace, the recently added gear is normally drawn on top of the gear that is already on the workspace. That might result in, for example, flames being drawn on top of the water spray. To change the drawing order, click on an item to select it and then choose one of the Arrange commands on the Home toolbar. Learn about the drawing order.