
This also applies to cable, chain, and webbing.
Gear that is anchored includes anchors, rocks, trees, tripods, trucks, etc.
A "bight" is a simple loop in a rope that does not cross itself.
A "bend" is a knot that joins two ropes together. Bends can only be attached to the end of a rope.
A "hitch" is a type of knot that must be tied around another object.
"Descending devices" (e.g., ATCs, Brake Bar Racks, Figure 8s, Rescue 8s, etc) create friction as their primary purpose. The friction in descending devices is always considered when calculating forces.
The "Safety Factor" is the ratio between the gear's breaking strength and the maximum load applied to the gear (e.g., 5:1).
The Ropes page in the Gear Builder controls how ropes (i.e., cable, chain, rope, and webbing) connect to gear. The term "rope" on this page refers to all of these materials. Most of the options on the Ropes page are disabled unless you specify that the gear connects to chain, rope, or webbing. Learn more about working with rope.

Select this box if the gear can connect to chain. When this box is selected (and the "Connects to rope" checkbox is not selected), you can grab the ends of the chains that are displayed in the Gear Builder and drag them to the desired locations on the gear's image. If the ends of the chains are not displayed, use the scrollbars or the Zoom button to see more of the image.
Most of the options on this page are disabled unless you specify that the gear connects to chain, rope, or webbing.
Select this box if the gear can connect to cable or round rope. When this box is selected, you can grab the ends of the ropes and drag them to the desired locations on the gear's image. If the ropes are not displayed, use the scrollbars or the Zoom button to see more of the image.
Most of the options on this page are disabled unless you specify that the gear connects to chain, rope, or webbing.
Select this box if the gear can connect to webbing. When this box is selected (and the "Connects to chain" and "Connects to rope" checkboxes are not selected), you can grab the ends of the webbing and drag them to the desired locations on the gear's image.
When the webbing checkbox is selected, you can choose whether the webbing meets other gear vertically or horizontally. For example, webbing connects to a tree primarily in a vertical orientation (because the sides of a tree are vertical), but webbing connects to an upright carabiner horizontally.
It is easiest to see the effects of the webbing orientation setting by temporarily unselecting the "Connects to chain" and "Connects to rope" checkboxes.
This option lets you specify if the two rope segments are drawn in front of the gear, behind the gear, or if one rope segment should be drawn behind the gear and one segment in front. Most gear, like carabiners, will have one rope segment drawn in front and one behind. Pulleys usually have both ropes drawn behind.
Specify the maximum number of ropes that can connect to this gear. This refers to chain, rope, and webbing.
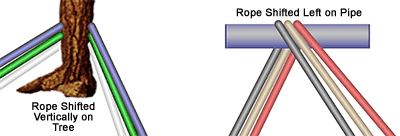
If more than one rope can connect to the gear, you can specify the direction to shift the ropes. Select Up or Down if you want the ropes to move vertically (e.g., on a tree or vertical pole). Select Left or Right to move each rope horizontally (e.g., on a horizontal pipe). Select Inward if you want successive ropes moved toward the center (e.g., on a double pulley). Select None if multiple ropes should all connect to the same location (e.g., a hand). This option is disabled if the maximum number of ropes is less than two.

On most gear, the rope entry and exit points remain at fixed locations. For example, on a pulley the rope connection points never change.
However, on some gear the rope connection points need to move within an open area. For example, on the carabiners shown to the right, the rope can enter/exit either from the top or the bottom of the carabiners.
In this carabiner example, the Auto-switch rope between top/bottom points checkbox was selected. The Gear Builder then draws a dotted line between the two rope connection points to illustrate that the rope will automatically switch between these two points. To better understand the Auto-switch checkbox, use the Gear Builder to edit one of the existing carabiners.
The Auto-switch between top/bottom checkbox is disabled if the Can wrap-3-pull-2, Can only connect to the end of a rope, Is a ratchet device, or Reverse the default rope routing checkboxes are selected.

Select this checkbox if the gear can only connect to the end (i.e., the tail) of a rope. When this checkbox is selected, the rope will enter the gear, but it will not exit. The connected gear will replace the red dot that normally appears at the end of a rope. For example, the "Load (ball)" shown to the right is connected to the end of the rope.
This option is also helpful when you are creating a winch or hook, such as the Retractable Lifeline.
The Can only connect to the end of a rope checkbox is disabled if the Auto-switch between top/bottom, Can wrap-3-pull-2, or Is a ratchet device checkboxes are selected.
Select this box if the gear should support the Wrap-3-pull-2 command. When the Wrap-3-pull-2 command is selected, a segment of rope is automatically drawn between the two rope connection points. This extra segment is displayed on the Ropes page of the Gear Builder when the Wrap-3-pull-2 checkbox is selected.
The Can wrap-3-pull-2 checkbox is disabled if the Auto-switch between top/bottom, Can only connect to the end of a rope, Is a ratchet device, or Reverse the default rope routing checkboxes are selected.
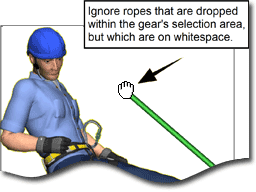
Select this box if ropes that are dropped on white (or transparent) areas of the gear should be ignored.
As shown in the illustration to the right, when this box is not selected, dropping a rope anywhere within the rectangular area occupied by the man will cause the rope to connect to the man. When the box is selected, you must drop the rope on the man. When used appropriately, selecting this box prevents ropes from unintentionally connecting to gear (e.g., this man).
In general, you should select this box for objects that are surrounded by a large amount of blank (i.e., transparent) area. For example, most "people" should have this box checked while "carabiners" should not. If you did select this box for a carabiner, you would have to drop the rope onto the carabiner itself—dropping a rope on the open area in the center of the carabiner would be ignored.
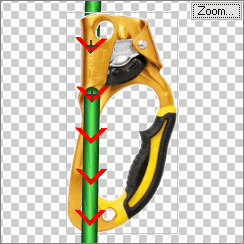 Some gear allows the rope to slide freely in one direction but prevents it from moving in the opposite direction. This type of gear is called a ratchet or progress capture device. Examples include ascenders, Prusiks, and Rescucenders.
When this checkbox is selected, red arrows appear on the rope indicating the direction that the rope can move through the gear. Select the Reverse ratchet direction checkbox to change the direction.
The Is a ratchet device checkbox only affects force calculations. An identical checkbox is located on the Forces page of the Gear Builder.
The Is a ratchet device checkbox is disabled if the Auto-switch between top/bottom, Can wrap-3-pull-2, or Can only connect to the end of a rope checkboxes are selected. It is also disabled if the Is a descending device, Is a knot, and Can pull or release rope checkboxes are selected on the Forces page.
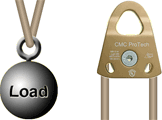
Select this checkbox if the rope enters and exits at the same location. For example, the rope should enter and exit at the same location on the load shown here, but it should not enter and exit at the same location on this pulley.
The Ropes enter and exit from the same location checkbox is disabled if almost any of the checkboxes in the Options section on the Ropes page are selected.
vRigger normally routes ropes to the nearest rope connection point. If you select this checkbox, the ropes will route to the furthest rope connection point. This rarely-used setting is helpful if the rope that connects to the lower connection point (such as the Petzl I'D) should go up to an anchor. This command is also available in the properties pane and in the gear's shortcut menu. Learn more about the reverse ropes routing command.
The Reverse the default rope routing checkbox is disabled if the Auto-switch between top/bottom, Can only connect to the end of a rope, or Ropes enter and exit from the same location checkboxes are selected.
Select these checkboxes to have small sections of chain, rope, or webbing displayed on the gear whenever the gear is connected to one of these items. In the following examples, "extra" rope segments were used to draw the rope between the brake bars and on the Rescue 8.
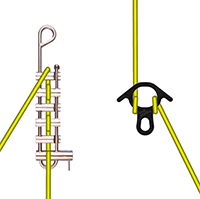
You can position the "extra" rope segments by dragging the ends of the segments using your mouse. (If it is difficult to grab the end of the rope, use the Zoom button to change the size of the image.)
To can move the end of a rope by clicking and dragging it with your mouse.
You can "nudge" the end of a rope by clicking on the end of the rope and, while still holding your mouse button pressed, pressing the arrow keys on your keyboard to move the end of the rope one pixel at a time.