This also applies to cable, chain, and webbing.
Gear that is anchored includes anchors, rocks, trees, tripods, trucks, etc.
A "bight" is a simple loop in a rope that does not cross itself.
A "bend" is a knot that joins two ropes together. Bends can only be attached to the end of a rope.
A "hitch" is a type of knot that must be tied around another object.
"Descending devices" (e.g., ATCs, Brake Bar Racks, Figure 8s, Rescue 8s, etc) create friction as their primary purpose. The friction in descending devices is always considered when calculating forces.
The "Safety Factor" is the ratio between the gear's breaking strength and the maximum load applied to the gear (e.g., 5:1).
Working with chain in vRigger is more complex than working with cable, rope, and webbing. You should be very comfortable working with rope in vRigger before using chains.
vRigger has three different chain items: Chain (rigid), Chain (flexible), and Chain (end).
What do you want to do?
The rigid chain contains 12 links. Gear connections on each end of the rigid chain allow you to connect multiple strands of rigid chain and to connect the rigid chain to other pieces of gear.

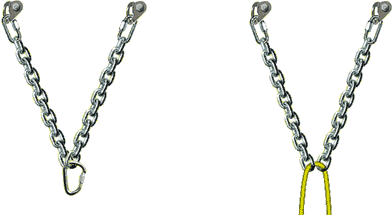
Rigid chain is helpful when creating "climber's chains" at the top of sport climbs. You can join the chains using other gear (like the carabiner and screw links shown here) or drop a rope on the rigid chains to route it through the last link. (Ropes always connect to one end of the chain, so you may need to rotate the chain 180°.)

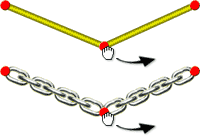
Working with flexible chain is very similar to working with cable, rope, and webbing. You can drag the ends of the chain or drag any point on the chain (be sure to grab a chain link and not the whitespace inside the links).

 The flexible chain connects to a limited number of items. For example, you can run the chain through carabiners and around trees, but you cannot connect a chain to a knot or route it through a pulley. As with rope and webbing, you should drop the chain on the item you want to connect it to (e.g., a tree) rather than dropping the item on the chain.
On gear that can only be connected to the end of chain, rope, or webbing, such as the round load shown here, be sure to drop the end of the chain (where the red dot appears) on the item.
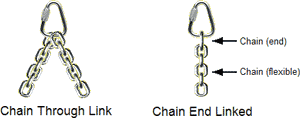
A complexity of working with flexible chain occurs when you want to connect the last chain link to other gear. For example, if you simply drag a flexible chain and drop it on a tri-link, the chain will route through the tri-link as shown below-left. This is similar to how dropping a rope on a carabiner routes the rope through the carabiner.
To connect the end of the flexible chain to the tri-link (rather than having the chain pass through it), you must use a "Chain (end)." The chain end will connect to the "gear connection" (the blue dots that are displayed while dragging gear) on the tri-link. You can then drop the end of the flexible chain onto the "Chain (end)."

In the above-left illustration, the flexible chain was simply dropped on the tri-link. In the above-right illustration, a "Chain (end)" was first connected to the blue connection dot on the tri-link, and the end of the flexible chain was then connected to the "Chain (end)." Yes, it is a little confusing, but with practice the concept of using a "Chain (end)" to connect a chain to a gear connection will make sense. The online video about chains demonstrates the use of chain ends.
Click your right mouse button on a chain to display its shortcut menu (be sure to click on a chain link and not on the whitespace within the links).
You can change properties such as the size and strength of a chain in the properties pane.
Watch a video that explains how to work with rope and webbing.
You can use slack points to route chains anywhere.
When clicking your mouse on flexible chain, make sure you click on the actual chain and avoid the white area between the links.
The flexible chains may feel sluggish on slower computers.