home button menu

vRigger Learning Center

This also applies to cable, chain, and webbing.

Gear that is anchored includes anchors, rocks, trees, tripods, trucks, etc.

A "bight" is a simple loop in a rope that does not cross itself.

A "bend" is a knot that joins two ropes together. Bends can only be attached to the end of a rope.

A "hitch" is a type of knot that must be tied around another object.

"Descending devices" (e.g., ATCs, Brake Bar Racks, Figure 8s, Rescue 8s, etc) create friction as their primary purpose. The friction in descending devices is always considered when calculating forces.

The "Safety Factor" is the ratio between the gear's breaking strength and the maximum load applied to the gear (e.g., 5:1).

Photoshop

This page explains how to use Adobe Photoshop to create images for use in vRigger's Gear Builder. The instructions should also apply to the less expensive Photoshop Elements software, but they were written using Photoshop 2021.


Photoshop is a powerful, yet undeniably complex, software program. Refer to Photoshop's Help for more information.

1. Obtain a digital image of the gear

You will need a digital image of the gear that you want to add to vRigger. In many cases, you will be able to find an image on the internet (e.g., try Google's Image Search). If you do use an image from the internet, make sure that you don't violate copyright laws.

Look for a picture that:

  • Is on a transparent background (i.e., the photo only includes the gear). This type of image will be in the png (or maybe tif) file format. Finding an image that is on a transparent background will allow you to skip most of the instructions on this page.
  • Is in focus and large. We prefer images that are larger than 1,000 pixels in at least one of the dimensions.
  • Was photographed straight-on rather than at an angle. This will improve its appearance when connected to ropes and other gear.

If you photograph the gear yourself:

  • Use new, unscratched gear. (You don't want to spend time in Photoshop if the gear isn't perfect.)
  • Place the gear on a plain background with a contrasting color (e.g., a white piece of paper).
  • Consider the lighting to avoid shadows.

2. Crop the image in Photoshop

  1. In Photoshop, open the file that was obtained in Step 1.
  2. Press C to select the crop tool.
  3. Use your mouse to drag the cropping rectangle so it isolates the gear. Leave some space between the edge of the gear and Photoshop's cropping rectangle—you'll do the final cropping later.
  4. Press Enter to complete the cropping.

3. Unlock and rename the background layer

  1. Locate the Layers palette in Photoshop (shown here). If it isn't displayed, select Layers in Photoshop's Windows menu.
  2. Double-click on the italicized word "Background".
  3. The New Layer dialog will appear.
  4. Type "Gear" and click OK.

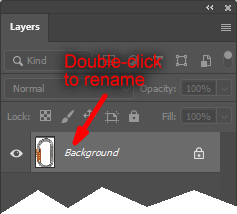
(This step will remove the padlock from the layer and allow you to edit the image.)

4. Erase the background

The next task is to erase everything except the gear image. If your image file already has a transparent background, great! You can jump to step 5.

The following instructions explain several Photoshop tools that you can use to erase the background. The eraser tool is probably the easiest, although some of the other tools are more powerful. Note that these instructions summarize complex Photoshop commands—please refer to Photoshop's Help for details.


General

You should be familiar with the following Photoshop commands:

  1. Press Ctrl-[+] to zoom in and Ctrl-[-] to zoom out.
  2. Use the scrollbars to move the image. (You can also press the Space bar and then click and drag the image to scroll it, although if you forget to press the Space bar you will accidentally move the image itself.)
  3. Press Ctrl+Z to undo changes if you make a mistake. Depending on the tool you are using, the undo command will often undo everything you changed since you last released your mouse button, so it is a good idea to release the mouse button occasionally.

The goal is to erase everything on the Gear layer except the gear itself. Take your time, be careful, and zoom in very tight. Undo your changes if they aren't perfect.
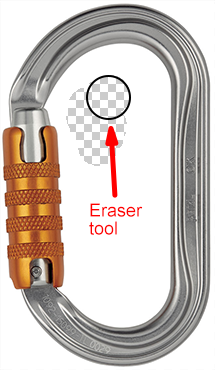

Eraser Tool

The eraser is the easiest of these Photoshop tools. It works well if your image is very large so you can zoom in on the gear.

  1. Select the eraser from the Tools palette (or press E).
  2. On the toolbar at the top of Photoshop, set the Mode to Pencil.
  3. Adjust the size of the eraser by pressing the "[" and "]" keys.
  4. Using your mouse, carefully erase the area around your gear. The area you erase will reveal Photoshop's checkerboard background (you can see the checkerboard on the adjacent illustration).

To accurately use the eraser, you should zoom in extremely close (i.e., press "+"). You should be zoomed in much closer than the example shown here. This will make it easier to precisely move the eraser along the edge of the gear. If you make a mistake and erase part of the gear, even a tiny part, select Undo and try again.


Magic Wand

The magic wand is a powerful Photoshop tool. It is the tool we use if the gear is on a solid background (e.g., on a pure white background as with this carabiner).

  1. Select the magic wand from the Tools palette (or press W).
  2. On the toolbar, select the Contiguous box. If you don't select this box, areas on your gear may be selected and erased (in addition to the background).
  3. Click on the background area (i.e., white in this example). Photoshop will select everything that has a similar color to the location you clicked. In this example, we clicked inside the carabiner so Photoshop selected everything with a similar color that was inside the carabiner.
    If your background is less homogeneous, you can change the wand's Tolerance setting on the toolbar to change how "similar" the color must be for Photoshop to select it. Lower numbers require more similarity (so less area will be selected) and higher numbers allow more difference between the colors (so more area will be selected). We start with 20.
  4. After the area has been selected, press Delete. The background should be replaced with Photoshop's checkerboard pattern.

The magic wand is an awesome tool, but be careful. If the Tolerance is set too high, you may accidentally select part of your gear. If it is set too low, some crucial areas where the gear and background meet won't be erased. We suggest that you only use the magic wand when the background is very homogeneous (because it is quick), and use the eraser or lasso on more complex backgrounds.


Polygonal Lasso

The polygonal lasso lets you manually select an irregular area. The polygonal lasso selects the area as a series of small, straight lines. It is best with gear that has straight lines and requires a bit more effort to select a curved area (like this carabiner), but this is our preferred tool if the magic wand doesn't work.

  1. Select the polygonal lasso from the Tools palette (or press U).
  2. Zoom in very close (i.e., press "+").
  3. Click on an edge of the gear. This starts the selection process.
  4. Click again on the border between the gear and its background. This selects a straight line between the two clicks. Repeat this process to select the area as a series of small, straight lines. On curved gear, like this carabiner, you should click frequently to smooth out the curve.
  5. Double-click your mouse when you are done selecting—this connects the first and last points. (Be careful, because this last line is drawn directly between the starting and ending points; it is usually best to click once near the starting point before double-clicking.)
  6. Press the Delete key.

Although the polygonal lasso selects using straight lines, it is extremely effective and can be used on curved gear.


Confirm that the background is erased.

After erasing the background, your gear should look similar to this, with only the gear and Photoshop's checkerboard background displayed.

5. Save the file as a psd (Photoshop) file

Now is a good time to save the image as a Photoshop (psd) file. This will be helpful if you need to edit it later.

  1. Choose File > Save As.
  2. Change the Save as type to "psd".
  3. Choose Save.

6. Re-crop the image

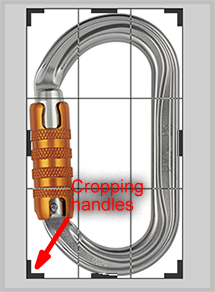
The following steps remove the transparent area outside of the gear.

  1. Choose Image > Trim in Photoshop's menu.
  2. Choose Transparent Pixels in the Trim dialog.
  3. Choose OK.

7. Size the image

Choosing the optimum image size can be difficult because rigging illustrations look best when some items, like people and tripods, are smaller than they are in the real world. We use the following general guidelines.

For most handheld gear, multiply the length of the gear in inches by 50. For example, if a carabiner is 3 inches long, the image should be 150 pixels long. When you create the gear using vRigger's Gear Builder, you should then set the "reduce the image size" option to 75 percent. We use this method for almost all gear.

For handheld firefighting gear, like nozzles, follow these same steps but use 25 pixels per inch. For example, if a nozzle is 8 inches long, the image should be 200 pixels long. When you create the gear using vRigger's Gear Builder, again set the "reduce the image size" option to 75 percent.

People and tripods should be sized so they are 900 pixels tall and reduced to 50% or 40%, respectively.


Type Size Reduction
Handheld rigging gear 50 pixels per inch  75%
Handheld firefighting gear  25 pixels per inch  75%
People 900 pixels tall  50%
Tripods 900 pixels tall 40%

After determining the appropriate size of the gear image in pixels, resize the image in Photoshop. Note that before we resize the gear, we save a backup file or convert the Gear layer in Photoshop to a Smart Object, so we don't lose detail if we ever want to increase its size.

  1. Press Alt+Ctrl+I to display Photoshop's Image Size dialog.
  2. Make sure the "Constrain Proportions" checkbox is checked.
  3. Change either the width or height to the desired size (as discussed above). (Both dimensions should change, because the proportions are constrained.)
  4. Click OK.

8. Export the image as a png file

This step saves the image in the png format. This format is required by vRigger's Gear Builder and preserves the transparency.

  1. Choose File > Export > Export As.
  2. Select "PNG" in the Format list.
  3. Choose Export.

9. Create an icon file

When you load the main image in the gear builder, you are asked if you want to create the icon image based on the main image. That is the best choice in almost all cases. However, if you want to specify a different image for the icon, the following steps create a 32x32 pixel icon file. The icon file can be in either the bmp or png format, however it must be on a white, rather than a transparent, background.

Rename the Photoshop file so you don't accidentally overwrite the main image with the smaller icon.

  1. Choose File > Save to save the main image. This is important so you don't lose unsaved changes to the main image.
  2. Choose File > Save As and save the file with its original filename plus "-Icon" (e.g., "Carabiner-D-Icon.psd").

Now resize the image to a maximum of 32 pixels.

  1. Press Alt+Ctrl+I to display the Image Size dialog.
  2. Make sure the "Constrain Proportions" checkbox is still checked.
  3. Change the largest value, either the width or height, to 32 pixels. In the example shown here, the height of 112 should be changed to 32. (The other number, the width of 82 in this case, will automatically be changed to a number less than 32.)

Next, resize the "canvas" to 32x32 pixels. This changes the overall size of the image without changing the gear's appearance.

  1. Press Alt+Ctrl+C to display Canvas Size dialog.
  2. Set both the width and height to 32 (one of these should already be 32).
  3. Click OK.

You should now have a 32x32 pixel image of your gear. The image should not be distorted (which will happen if you confuse the Image Size, Alt+Ctrl+I with the Canvas Size, Alt+Ctrl+C).
 

  1. Choose File > Save to save the Photoshop file. (This isn't really required, as you probably won't need to keep the icon in a Photoshop file because it can be recreated from the main Photoshop file).
  2. Choose File > Save As and change the "Save as type" to "BMP".
  3. Use the default filename (which will probably be the main image name with "-Icon" appended to the name).
  4. Click Save.

10. Create the gear in vRigger

  1. Start vRigger.
  2. Display the Gear Builder (Ctrl+Shift+A).
  3. Click the New button.
  4. Enter the name of the new gear file (e.g., "Carabiner.rra").
  5. On the Graphics page, click on the Load main image button and select the main png file you created in Step 8 (e.g., "Carabiner.png").
  6. Fill in the information on the five tabbed pages in the Gear Builder. (Be sure to look at the instructions that are displayed at the bottom of the Gear Builder as you fill in the information. Click on the Help button for assistance.)

Watch a video that explains how to create your own gear.